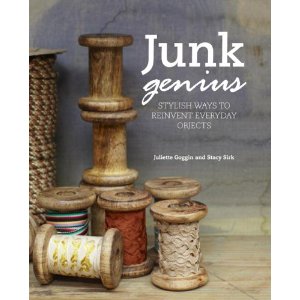
Turn junk into gems ….
Many of us have corners and attics crammed with old stuff; things we no longer need or use.
But before you go saying, ‘What a load of rubbish’, take a look at what Juliette Goggin and Stacy Sirk have to say in their new book, Junk Genius.
It features 80 ideas of ways in which you can turn, well, junk, into delightful new decorative and functional homewares.
Not sure what to do with the pile of old scarves you haven’t worn for years? How about transforming them into a fancy new lampshade, or stylish cushion cover?
As for that pile of old jumpers you need to get rid of… The sleeves could make nifty little mobile phone covers.
All you need is a quiet afternoon – hunt out your junk then follow Goggin and Sirk’s step-by-step instructions and you might just be amazed by what you end up with.
The book features projects suited to beginners about to pick up the scissors and glue for the first time, as well as more advanced tasks for veteran crafters.
And don’t be worried if you have already thrown out junk you could have used – Goggin and Sirk have the answer: “Junking is about unearthing the unexpected in unlikely places. Somehow this random slow seeking-out is very therapeutic!”
Some of the items in the book would make ideal home-made gifts, and being creative will have other benefits too. As the girls say: “Just the fun of being creative and making something one-of-a-kind is hugely enjoyable.”
Here are four Junk Genius ideas to get you started:
MEMORIES ON A STRING
All of us have little things tucked away in drawers that bring back special memories when we come across them. This project brings them all together.
:: Tie on jump rings at roughly 2in (5cm) intervals along a length of silk string. As you find your small treasures, attach each one to a ring. If an item has no natural hanger, fix a jump ring to it with Superglue or epoxy glue. Tie in larger jump rings at each end of the string and hang them from small screw hooks in the walls.
WINTER LANTERNS
Old glass jars and odd tumblers make wonderful winter lanterns when wrapped up in the sleeves of woollen sweaters that you no longer wear but can’t bear to throw away.
:: Any small candleholders that fit inside the jar will work, but you can also improvise, using a cut piece of copper piping, for example. If you want to fix the candleholders permanently in the jars, use Superglue or epoxy glue. Otherwise, a very small amount of reusable adhesive, such as Blu Tack will do the trick.
Making the covers couldn’t be easier, and there’s no sewing involved! Cut the sleeves off a sweater just below the shoulder, then hold them up to the jars, with the cuff at the top. Cut across the sleeves at the bottom so they are about 1 inch (2.5cm) longer than the jars. Slide them over the top until the cuff is just below the rim, then tuck under any excess sleeve at the bottom.
For the most light to shine through the sleeves, use white candles, but as they won’t be visible, it doesn’t matter what kind of shape they are in. Tealights work best in short jars and tumblers.
BIRDCAGE LAMPS
I am not sure why we love old birdcages so much but we do, and our favourite way of using one is to wire it up and make a light. Some cages easily convert to pendant lights, but this small version with feet is perfect as a table lamp. Placing ornaments inside, such as vintage ceramic birds is a lovely touch. Or you could go mad and decorate it with little figurines, as we did!
:: Materials needed:
Vintage birdcage with
a solid floor
Dishwashing liquid
Electric drill
Light fitting
Electrical cord (flex)
Cord grip
:: Clean your birdcage thoroughly with dishwashing liquid. When completely dry, drill a hole through the bottom in the centre.
Ask an electrician to wire up the cage using a light fitting, electrical cord (flex), and cord grip, for the underside of the cage. Light fittings are available in ceramic, plastic, or metal. Choose one that will allow you to use a fairly small light bulb, preferably a filament bulb, which will look more attractive.
Once the light is in place, you can use the cage door to access the switch. Alternatively, have the electrician use a non-switch light fitting and fix a switch to the cord.
A hanging birdcage looks gorgeous at night filled with candles. For the garden, you could plant a birdcage with a vine.
METAL TIN CUPBOARDS
Old decorative tins with hinged lids make versatile little wall cupboards, particularly for the kitchen, hallway and bathroom. You can also mount a group of them together for a really effective and good looking storage system.
:: Hold the tin against the wall and mark the hanging position. Mark two holes inside the tin, about 2 inches (5cm) below the top, then drill.
Hold the tin against the wall and place a small spirit level on top to check the tin is level – having the lid loose and your hand inside will make this easier to do. Open the lid and mark the two holes through the tin on the wall behind. Take the tin down, drill out the holes, and insert a wall anchor (Rawlplug) into each.
Hold the tin back in place, with the lid open. Put a screw into each hole and tighten into place. If your tin has a small recess on the bottom, which is most often the case, add one or two black rubber washers between the tin and the wall, threaded onto the screw, to achieve the fitting.
Smaller tins, or tins with a portrait format, make an excellent key cupboard. Follow the steps above, but use screw hooks instead of screws. Best of all are screws with an end cap attached or with a separate extra cap. These will cover the holes beautifully and give a great finish.
Junk Genius is on sale at Amazon.co.uk retailing at £13.99
Latest posts by Sally - Silversurfer's Editor (see all)
- Will you be sending Christmas cards this year? - November 23, 2024
- Do you like the new Jaguar rebrand? - November 21, 2024
- Christmas Decorations Masterclass: Make your own Festive Wreath, Garland and Flower Centrepieces - November 21, 2024
- Finding warmth in cold days - November 21, 2024
- Fall in love with Norfolk Hideaways - November 20, 2024


